 Before you can download FREE C-MAP Genesis Social Map charts or your own custom-made C-MAP Genesis maps for on-the-water use in your boat, you must first register your Lowrance, Simrad or B&G sonar/GPS unit (AKA “chartplotter” “plotter” or “MFD”). You may register as many as four units for C-MAP Genesis map use.
Follow these step-by-step instructions to register your unit(s):
- Log in to your C-MAP Genesis dashboard at www.genesismaps.com
- Don’t know how to log in to your C-MAP Genesis dashboard? Follow these step-by-step instructions
- Scroll down to near the bottom-right side of dashboard page to the section titled “Plotters”
- Note: “Plotter” = Chartplotter, AKA “MFD,” “graph,” “sonar/GPS unit,” “fish finder,” “depth finder,” etc.
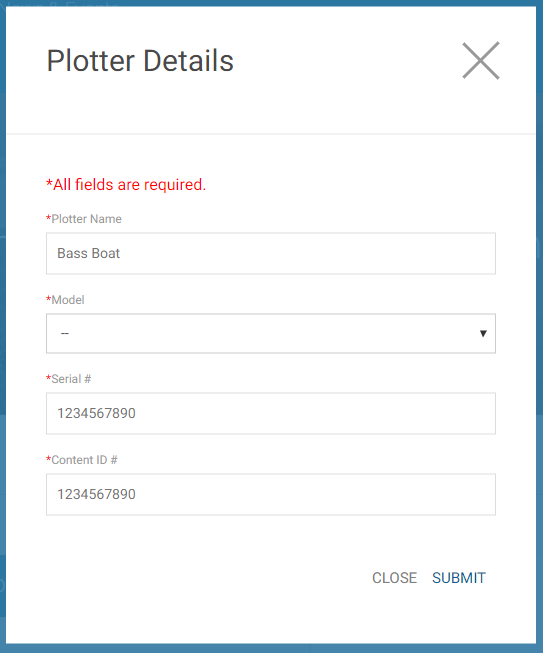
- Click “Add Device”
- In the first empty text-entry field of the pop-up box that opens, give your plotter a unique nickname (“Console-Mount HDS-9” for example) in order to differentiate it from additional plotters you own and register (“Bow-Mount HDS-9” for example)
- Note: You can register as many as four plotters. You must start with this step each time, even if all four of your plotters are identical models.
- Note: You can register as many as four plotters. You must start with this step each time, even if all four of your plotters are identical models.
- In the next two empty text-entry fields type in your sonar/GPS unit’s Serial Number and Content ID Number, respectively.
- Click the “Submit” button
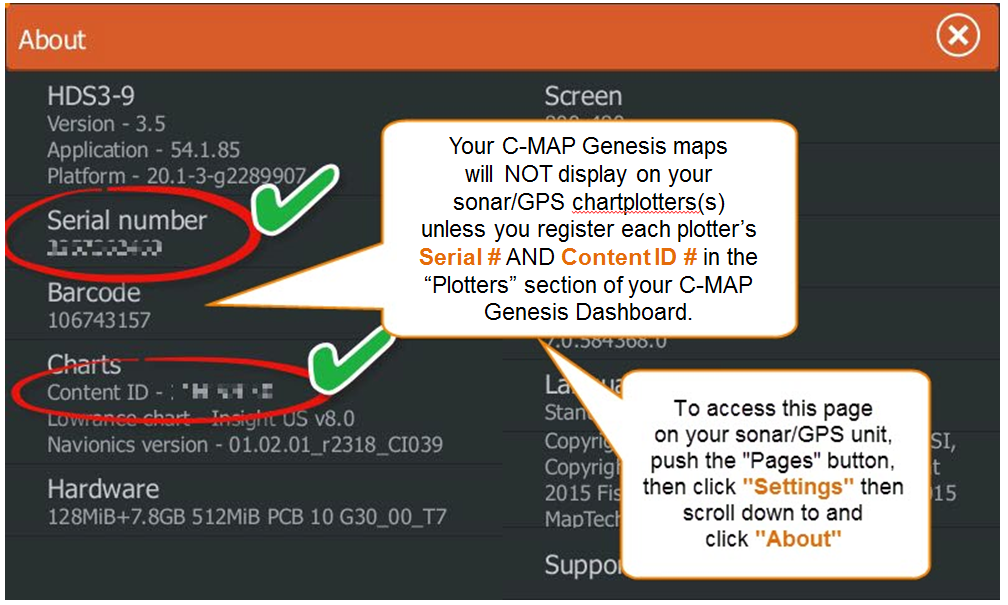
- Here’s how to find your Serial Number and Content ID Number on HDS Gen2 Touch, HDS Gen3 and Elite Ti units:
- Power on you sonar/GPS unit
- Press the “Pages” button to get to the Home Screen/Main Menu
- Press “Settings” (located on the lower left-hand corner of the screen)
- Scroll down to the bottom of the page and then press “About.” Your serial number and Content ID will be the third and and fourth line-items in the list in the window that pops up.
- Here’s how to find your Serial Number and Content ID Number on Lowrance Elite HDI & Lowrance Elite CHIRP units:
- While in any screen or split-screen, push the “Menu” button
- Use the down-arrow on the circular keypad to scroll down until “Settings” is highlighted and then push the “Enter” button
- Depending on what screen you began this process on, you will use either the up-arrow or down-arrow on the circular keypad to scroll up or down until “System” is highlighted, then push the “Enter” button
- Use the down-arrow on the circular keypad to scroll down until “About” is highlighted and then push the “Enter” button
- In the pop-up window that opens, your Serial Number will be the 6th line-item in a vertical list of 10 lines; your Content ID Number will be the 9th line-item
- Write down these numbers on a piece of paper, return with it to your computer, and type the numbers
- Here’s how to find your Serial Number and Content ID Number on an HDS Gen2 (non-touch) unit:
- While in any screen or split-screen, push the “Menu” button
- Use the down-arrow on the circular keypad to scroll down until “Settings” is highlighted and then push the “Enter” button
- Depending on what screen you began this process on, you will use either the up-arrow or down-arrow on the circular keypad to scroll up or down until “System” is highlighted, then push the “Enter” button
- Use the down-arrow on the circular keypad to scroll down until “About” is highlighted and then push the “Enter” button
- In the pop-up window that opens, your Serial Number will be the 5th line-item down in a list of 14 vertical lines;
- In the drop-down menu underneath the heading “Plotter Model,” scroll down until you find the name/model of the Lowrance, Simrad or B&G sonar/GPS you are registering
- Click the gray button labeled “Save Device”
- You may add three more plotters/MFDs/sonar units (for a total of 4).
- Once you have registered your chartplotter(s) you may display on them both custom-made maps you’ve created yourself or free charts downloaded from the C-MAP Genesis Social Map.
- Click HERE for step-by-step instructions on how to record sonar logs with which you can create your own custom-made C-MAP Genesis maps
- Click HERE for step-by-step instructions on how to download your custom-made C-MAP Genesis charts for use on your Genesis-registered chartplotter(s)/MFD(s)/sonar-GPS unit(s)
- Click HERE for step-by-step instructions on how to download FREE custom-made contour charts from the C-MAP Genesis Social Map for use on your Genesis-registered chartplotter(s)/MFD(s)/sonar-GPS unit(s)
- Here’s how to find your Serial Number and Content ID Number on HDS Gen2 Touch, HDS Gen3 and Elite Ti units:


how do i find my content id on a hook2 7x? i have found the serial number, but there is no line available for content id?
Putting a chart plotter into C map Genesis and submit button on scene will not show up. What is the problem????
Check the zoom level on your browser. You may be zoomed in and the submit button is cut off.