![]() Big gamefish ambush little baitfish in both submerged vegetation and along deep weed lines, neither of which are visible to the naked eye in most weather and water conditions. But with a Genesis Edge map, you can easily find and fish both deep weed lines and isolated submerged grass. This article will teach you how.
Big gamefish ambush little baitfish in both submerged vegetation and along deep weed lines, neither of which are visible to the naked eye in most weather and water conditions. But with a Genesis Edge map, you can easily find and fish both deep weed lines and isolated submerged grass. This article will teach you how.
With a Genesis Edge account (formerly Insight Genesis premium), you can create a custom grass map that will overlay on your blue-scaled contour map easy-to-see green patches that show the size and shape of the areas of submerged grass/vegetation you mapped.*
Fishing 101 tip: In the spring, gamefish will congregate in and around new, sparse vegetation. In the summer and fall, target deep weedlines.
Tournament tip: If you map the submerged grass/vegetation you idle over while “graphing” spots during practice for a tournament, you’ll find it easier during the tournament to find and target holes in grass beds, irregularities along weed lines and subtle depth changes within large areas of grass/vegetation.
 Genesis Edge users can follow the steps below to download to an SD card a custom Genesis Edge map with a vegetation layer and use it in a compatible* sonar/GPS unit on the water:
- Insert a blank SD card into your computer’s card-reader slot
- If your computer does not have an SD-card slot, you will need to purchase an external card reader that plugs into a USB slot on your computer
- If you are using an HDS Live, Carbon or Gen3, or an Elite unit, you must first insert a MicroSD card into the empty slot in an SD-card adaptor, or use a USB-slot adaptor that will accommodate a microSD card
- Log-in to your Genesis account and open your C-MAP Genesis Dashboard
- Don’t remember how to do that? Read this article to refresh your memory.

- Don’t remember how to do that? Read this article to refresh your memory.
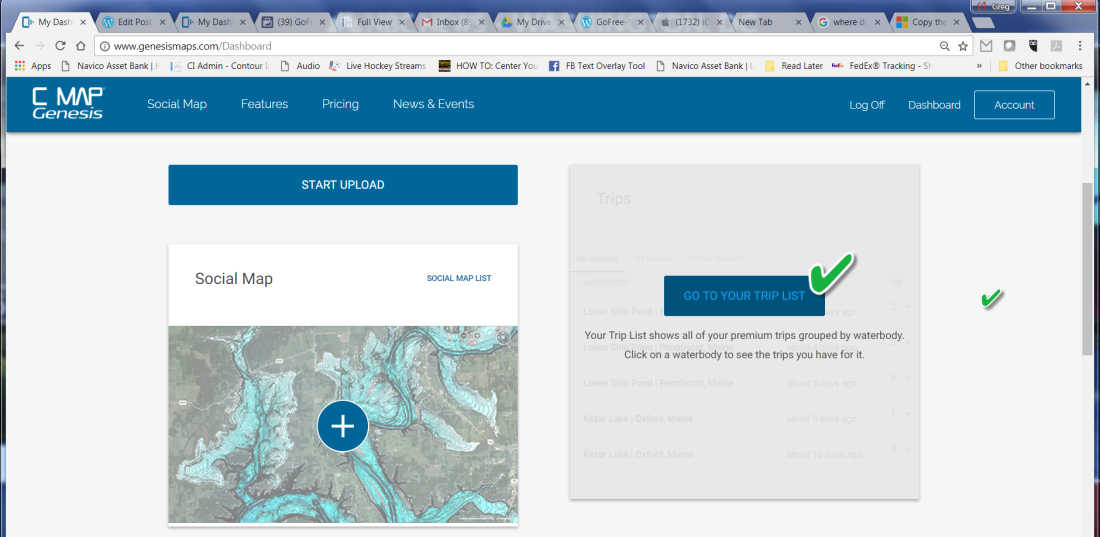
- Hover your cursor over the “Trips” window on the right-hand side of your Dashboard and click the blue button labeled “Go To Your Trip List”
- Open the trip or merged map for which you wish to create a grass/vegetation map
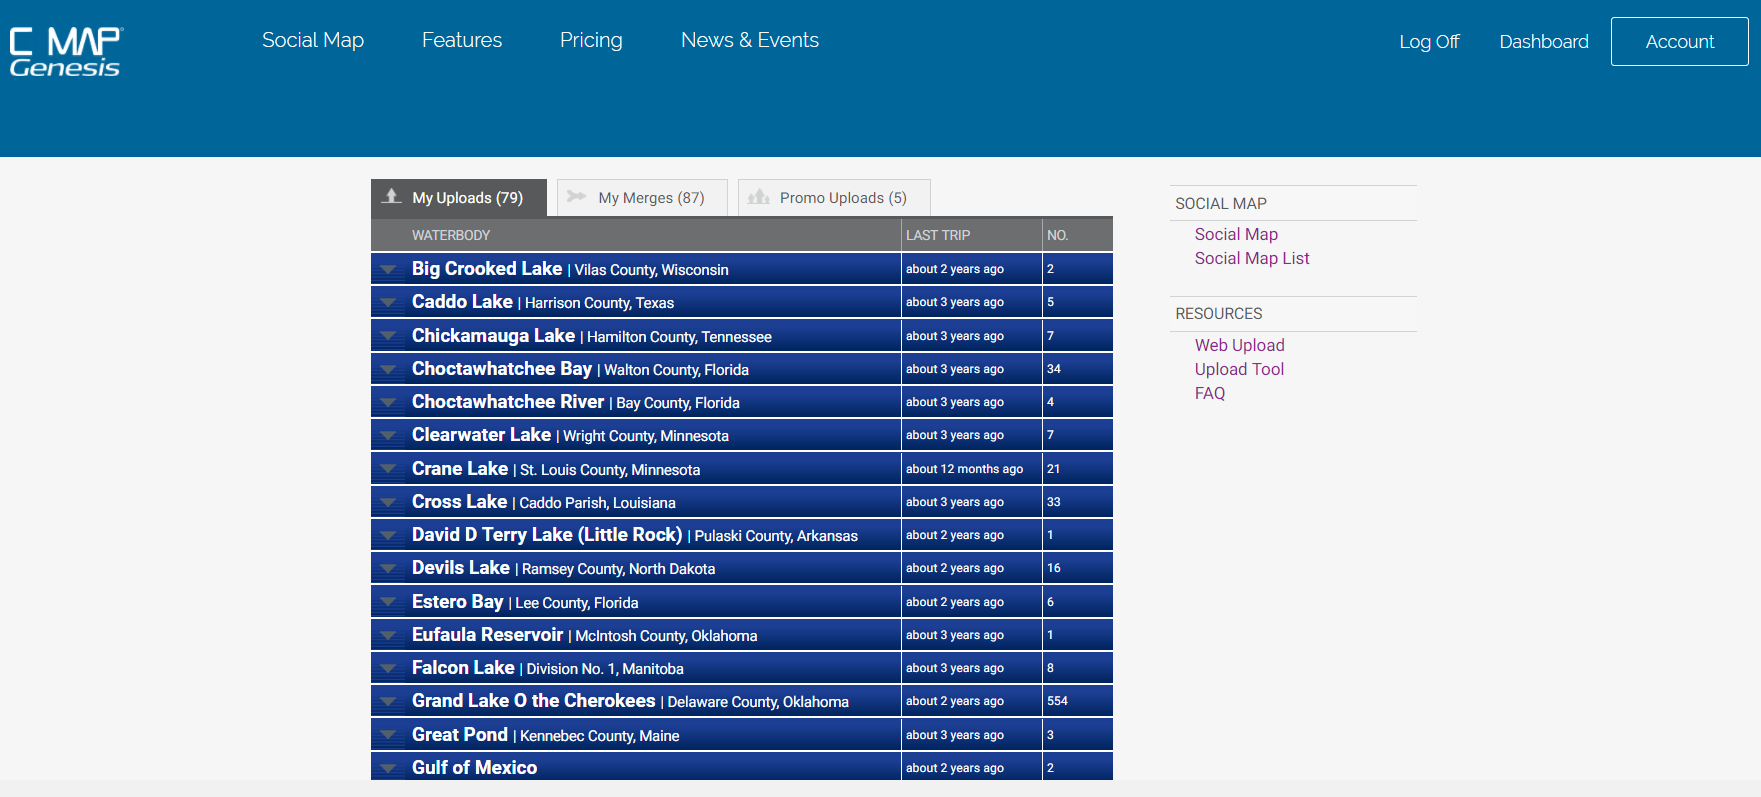
- A list of every waterbody on which you have recorded and uploaded a sonar log will be the page/tab that your C-MAP Genesis dashboard defaults to. This is the “My Uploads” tab (see image below)

- If you want to make a vegetation/grass layer for your map of a single trip, click the gray, down-pointing arrow located to the left of the name of the waterbody you’re interested in.
- This will open a drop-down menu of all your individual trips on that waterbody
- To open the map of any single trip, click the dark-gray button labeled “view trip”
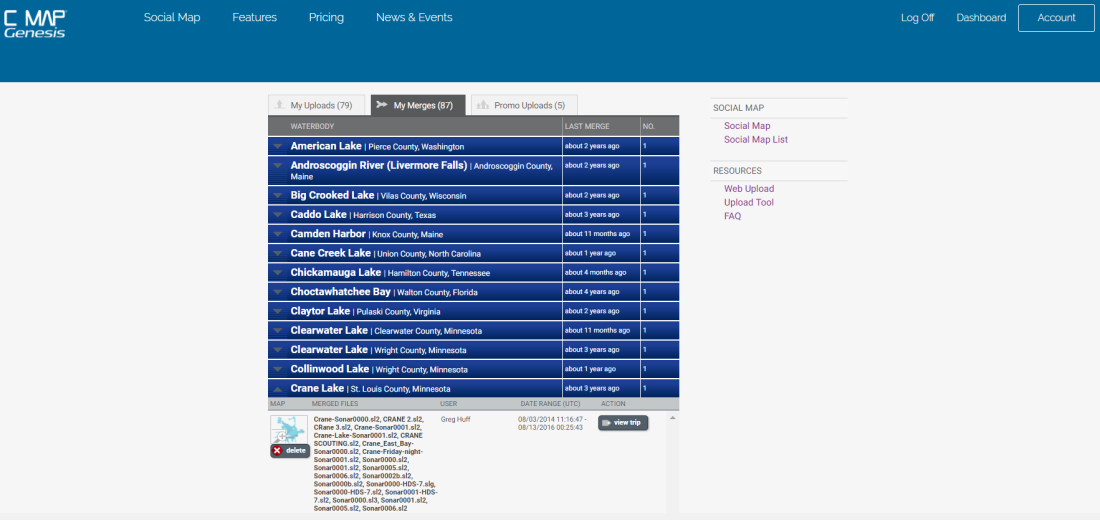
- If you want to make a grass/vegetation layer for one of your a merged maps, first click the light-gray tab labeled “Merged Uploads” at the top of your dashboard.
- A list will display of every waterbody for which you have merged the sonar logs from multiple trips into a master map
- Click the gray, down-pointing arrow located to the left of the name of the waterbody you’re interested in
- This will open a drop-down menu of all the merged maps you made of that waterbody (see image below)
- To open a merged map, click the dark-gray button labeled “view trip”
- Note: If you’ve made multiple merged maps for a particular waterbody, you can determine which one is which by clicking the small images of the waterbody on the left-hand side of the drop-down list
- Clicking a thumbnail will open a window that displays the individual track lines that are mapped out in the merge
- Note: If you’ve made multiple merged maps for a particular waterbody, you can determine which one is which by clicking the small images of the waterbody on the left-hand side of the drop-down list
- This will open a drop-down menu of all the merged maps you made of that waterbody (see image below)
- If you want to make a vegetation/grass layer for your map of a single trip, click the gray, down-pointing arrow located to the left of the name of the waterbody you’re interested in.
- A list of every waterbody on which you have recorded and uploaded a sonar log will be the page/tab that your C-MAP Genesis dashboard defaults to. This is the “My Uploads” tab (see image below)
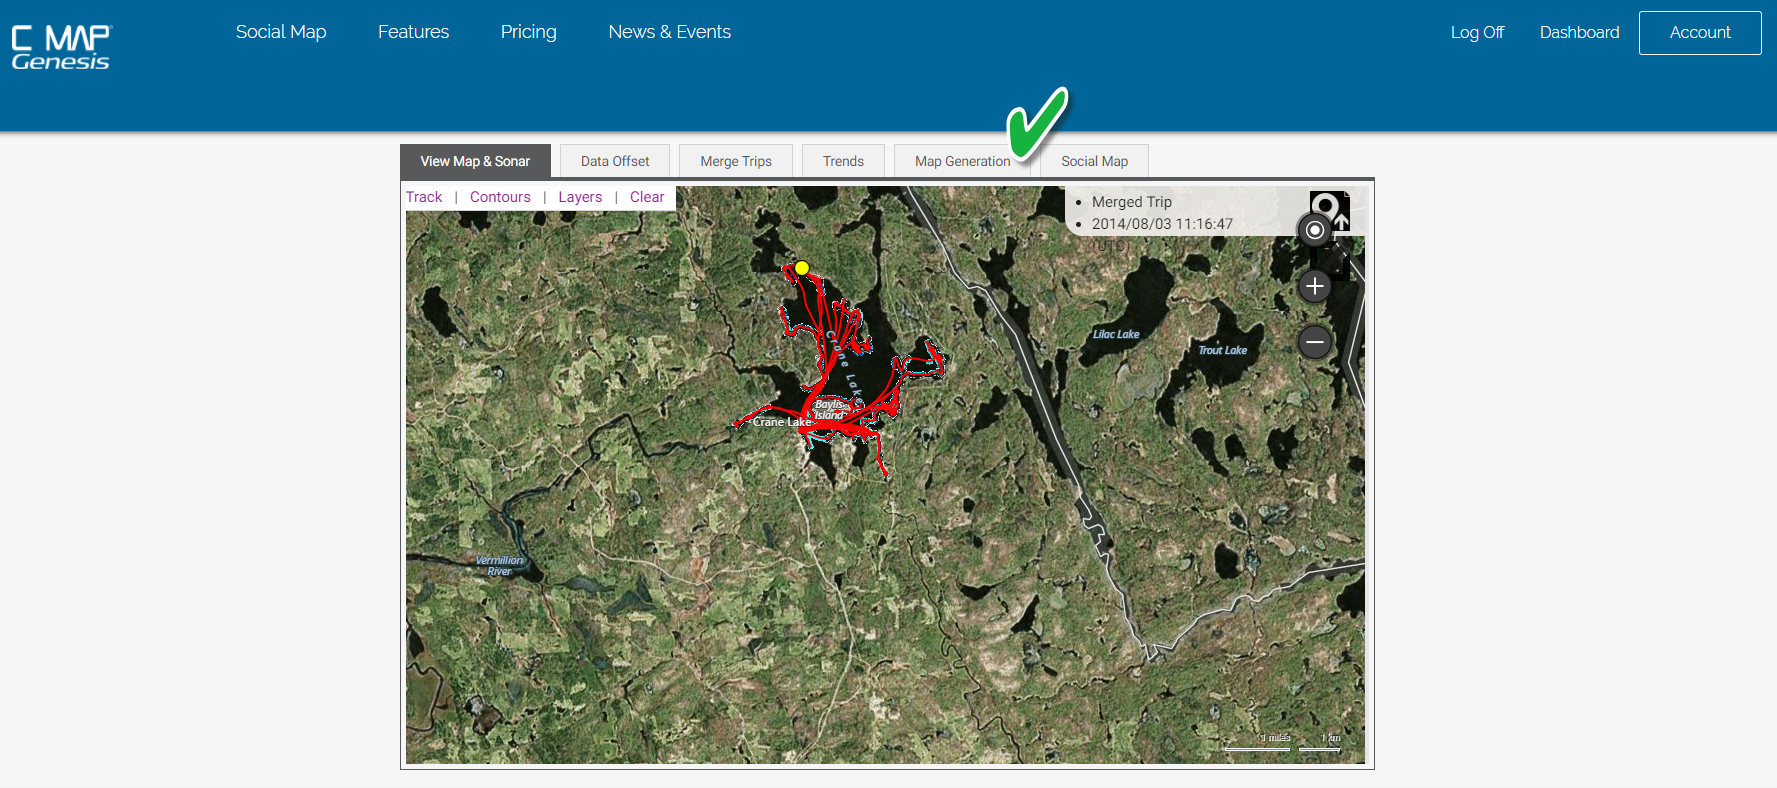
- After your map loads, click the “Map Generation” tab (5th tab from left) at the top of your dashboard window (see image below)

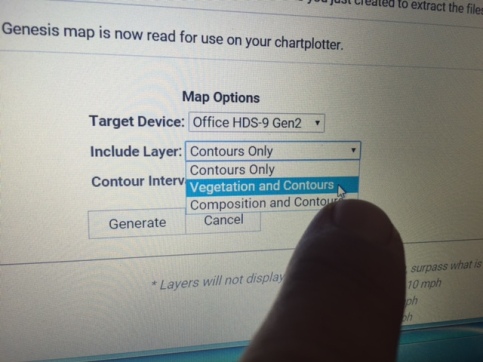
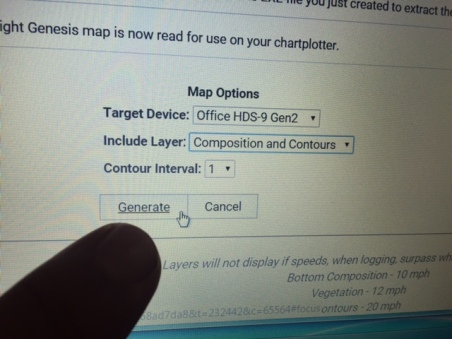
- In the “Target Device” drop-down menu (located under “Map Options” in the middle of the page), select the Lowrance or Simrad sonar/GPS unit in which you will use your downloaded map (See image below)
- Haven’t registered your sonar/GPS sonar units (AKA “chartplotters,” “MFDs,” “plotters”) yet? Click HERE for step-by-step instructions. You can register as many as four separate units.

- Haven’t registered your sonar/GPS sonar units (AKA “chartplotters,” “MFDs,” “plotters”) yet? Click HERE for step-by-step instructions. You can register as many as four separate units.
- In the “Include Layer” drop-down menu (located under “Target Device”) choose “Vegetation and Contours” (see image below).
- After making all your selections in the drop-downs explained above, click the light-gray button labeled “Generate” (see image below).
- Next, click the gray button marked “Download Map.”
- While the map file is downloading, you’ll see a rotating progress icon floating in the middle of your dashboard.
- Once the progress icon stops rotating, you will get the message “Successfully Generated Map! CLICK ‘SAVE’” … below that message will be a light-gray button labeled “Save” … Click that button.
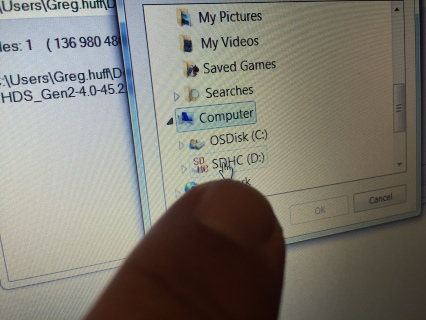
- If you’re using a PC: After clicking “Save,” a box will open allowing you to choose where you want to save the file
- Choose “SD (D:)” — you’ll see it listed under “Computer” in a vertical menu of options to the left-hand side of the window that opened (see image below)
- Type in the name of the waterbody and, if applicable, what additional layer it contains, like this: “Long_Lake-with-bottom_hardness.exe”
- Don’t make any changes in the next field, “Save as type” — leave it as is
- Click the “Save” button
- If your web browser is Chrome (which we recommend) you will most likely see, in the bottom left-hand corner of your dashboard, a small, red circle with a white dash in it, next to a message like this: “Long_Lake-with-bottom_hardness.exe is not commony downloaded and could be dangerous”
- To the right of that will be a white button labeled “Discard” — do NOT click that button
- To the right of that “Discard” button will be a small down-pointing arrow. Click it to open a dropdown then hover down to and click the word “Keep” … proceed now to Step #13 below
- To the right of that will be a white button labeled “Discard” — do NOT click that button
- Choose “SD (D:)” — you’ll see it listed under “Computer” in a vertical menu of options to the left-hand side of the window that opened (see image below)
- If you’re using a Mac: As soon as you click “Save File,” a compressed/zipped folder containing your map files will download to a pre-ordained spot on your computer, most likely your “Downloads” folder
- If you have not manually re-set your downloads to be saved somewhere else, it’s going to be in your “Downloads” folder
- The folder that downloads WILL NOT display the name of the waterbody — it will be named like this: “d254d90f-b3bf-41b7-b636-7c3204d0c0a3.zip (the code will be different for every waterbody)
- You should re-name that folder now with the name of the waterbody and, if applicable, what additional layer it contains, like this: “Long_Lake-with-bottom_hardness.zip”
- The folder that downloads WILL NOT display the name of the waterbody — it will be named like this: “d254d90f-b3bf-41b7-b636-7c3204d0c0a3.zip (the code will be different for every waterbody)
- If you have not manually re-set your downloads to be saved somewhere else, it’s going to be in your “Downloads” folder
- Before your map files will work in the Lowrance or Simrad sonar/GPS unit(s) on your boat, you must first extract the files (PC terminology) from the downloaded .exe folder/file or unzip the folder (Mac terminology) in which the map files are located.
- Depending on what kind of computer you are using, follow the PC-file-extraction or Mac-file-unzipping directions at the bottom of this page and then proceed to step #14 below
- Remove your SD card from your computer’s SD-card slot (or external card reader)
- Insert your SD card into a card slot on your Lowrance or Simrad sonar/GPS unit while the unit is turned off
- If you have a unit with two card slots, it does not matter if you use the top or bottom, or right or left slot
- Turn on your sonar/GPS unit
- Soon after your unit powers up, a dialog box will open and ask if you want to load the map that you saved onto your SD card — it will reference the waterbody by name
- On a HDS Gen2 Touch unit or on an HDS Gen3 unit, simply touch the button that is labeled “Yes”
- On non-Touch Gen 2 units and Elite units, press the appropriately pointed arrow on the circular keypad in order to move your cursor to “Yes”
- Once “Yes” is highlighted, click the button labeled “Enter”
- Your map — including the vegetation/grass layer — will then almost immediately load onto your unit’s map-display screen
- Your contour lines will be visible through the green patches of the grass/vegetation layer, so it will be easy to see at what depth the grass is growing
- You may, from time to time, want to temporarily turn off the grass/vegetation layer and display only your blue-scale contours. Here’s how:
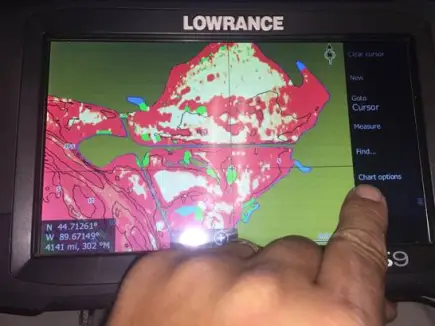
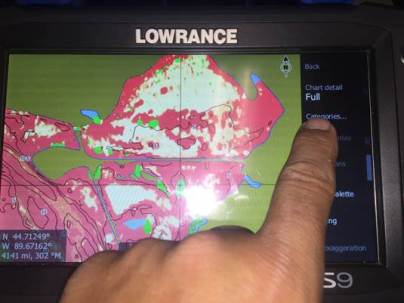
- Open the “Menu” drop-down on your “Chart” page
- Select “Chart Options” (as shown in image below)
- Select “View” (as shown in the image below)
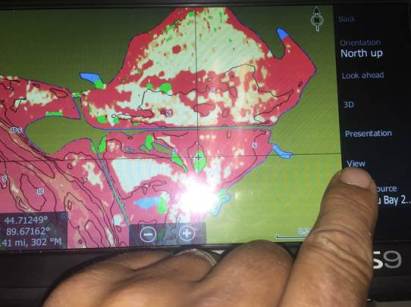
- Select “Categories” (as shown in the image below)
- A new window, titled “Chart Categories” will open. You will see a vertical list of (at least) five categories, with a check-mark box to the right of each. Following are the five categories you will most likely see (see image below):
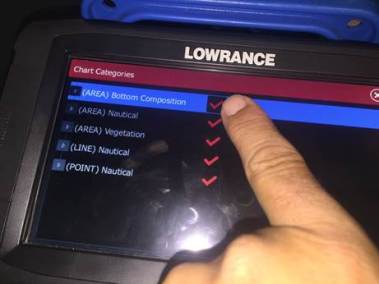
- (AREA) Nautical – Do not un-check this box
- (AREA) Vegetation & Composition – This is the grass-map layer (OR your bottom-hardness map, depending on which optional layer you chose to include when downloading your map)
- Un-checking this box it will deactivate the grass/vegetation layer on your map; re-checking the box will re-activate it on your map display
- NOTE: On an HDS Gen2 non-touch unit, you must press your “Enter” button to click, or un-click, the check-box. On an HDS Gen2 Touch, Gen3, Carbon or Live unit, simply touch the box with your finger to check, or un-check, it.
- All surveyed areas in which submerged vegetation comprises at least 20% of the water column’s bio-mass will overlay a green patch on top of your one-foot, blue-scale depth contours
- Emergent vegetation – growth you can see with the naked eye (reeds, cat tails, tules, lily pads, wild rice, etc) — may not appear on the vegetation map (especially if it is too thick through which to pilot a survey boat)
- Un-checking this box it will deactivate the grass/vegetation layer on your map; re-checking the box will re-activate it on your map display
- (LINE) Nautical – Do not un-check this box
- (POINT) Nautical – Do not un-check this box
- After un-checking the (AREA) Vegetation & Composition box, click the circled X in the upper right-hand corner of the “Chart Categories” window
- HDS Live, Carbon, Gen3 and Gen2 Touch ONLY
- On an HDS Gen2 non-touch unit, push the “Exit” button
- When you want to turn the vegetation layer back on, repeat the steps above, but instead of un-checking the Vegetation box, check it
- Study your map and pilot you boat to the deep weed line or isolated patch of vegetation that you’d like to fish


PC instructions
If your computer is a PC, follow these steps to extract your map files from the .exe file/folder you downloaded and saved to blank SD card
- Double-click the .exe file that you downloaded/saved to the blank SD card in your (D:) drive
- After double-clicking, a dialog box will open — just click the “Enter” button on your keyboard (or, you could click the “Extract” button), and your map files will extract and save themselves onto your SD card
- A total of five (5) additional files will extract and save onto your SD card. In addition to the original file you downloaded (the one with the .exe extension), you will see new files labeled exactly like this (depending on whether you use a Lowrance HDS or Elite unit):
- at5.xml
- permits.txt
- HDS_Large.at5 (or Elite_Large.at5)
- HDS_Medium.at5 (or Elite_Medium.at5)
- HDS_Small.at5 (or Elite_Small.at5)
- ALL 5 of those files must be on your SD card for your map to display on your sonar/GPS unit.
- A total of five (5) additional files will extract and save onto your SD card. In addition to the original file you downloaded (the one with the .exe extension), you will see new files labeled exactly like this (depending on whether you use a Lowrance HDS or Elite unit):
- At this time, we recommend creating a new folder on your computer, naming it “Lake Map Downloads” (or similar) and then dragging the .exe file off of your SD card and into that folder.
- The .exe file is not necessary to display the maps once the file map files are extracted from it
- However, it’s a good idea to save the original .exe file for each map you download
- Because if you should ever misplace the card onto which you saved the five map files detailed above, you can re-extract those files back onto another SD card at a later date, without having to download a fresh .exe file
- This is an especially important back-up process if you are traveling to fish in a remote area in which you will not have Internet/wifi access
- Proceed to Step #14 above
Mac Instructions
If your computer is a Mac, follow these steps to unzip the folder you downloaded and access your map files:
- Depending on your Mac’s operating system, your map’s file folder might un-zip itself while downloading. If it doesn’t, proceed to step #2
- Double-click the zipped folder
- A progress bar will briefly appear on your screen as the folder un-zips. Once that progress bar disappears, your unzipped folder will appear in the same folder that the zipped folder is located (in most cases, your “Downloads” folder, as explained above previously)
- After making sure your SD card is inserted into your computer’s SD-card slot (or external card reader) find the icon for your SD card on your desktop and drag the five files in your unzipped folder onto your SD card
- Rather than dragging and dropping, you could also copy and paste the five files in your folder onto your SD card.
- The five files should be labeled exactly like this (depending on whether you use a Lowrance HDS or Elite unit):
- at5.xml
- permits.txt
- HDS_Large.at5 (or Elite_Large.at5)
- HDS_Medium.at5 (or Elite_Medium.at5)
- HDS_Small.at5 (or Elite_Small.at5)
- Proceed to Step #14 above
* This layer will display on your Genesis Edge map in areas in which: A. Submerged vegetation comprises more than 20% of the water column’s biomass, and; B. Your boat speed, while logging sonar, was slower than 12 mph.
* To use C-MAP Genesis maps on the water, you’ll need a compatible Lowrance, Simrad or B&G chartplotter.


I understand all this, but no where in the process can I see the exe file. I have tried all processes and still unable to load maps? I has it to the shop and cleaned to sd card and they loaded in with the map and it worked. Note it contained 2 hidden files and the 5 normal ones whish sho up on the fishfinder but not my PC. So what are the other 2 files for and why are they not loading onto my sd card when downloading the maps. Help.