It seems that many of you have questions about the new social map. One of the biggest questions we get is “Can I download multiple tiles to display on my plotter. The short answer is Yes. In this blog we’ll cover how to download the tiles and best steps to keep the tiles organized on your SD card.
You do need to have a plotter already added to your account. To add a plotter please click on the “Plotters” button found on the “Dashboard.” For this example, we’ll look at Lake Pend Oreille as you can see in the screen shot below it covers 5 different tiles. Here are the steps to download tiles to be used on your plotter.
1. Click on the water droplet for the tile you wish to download and click Download Map:

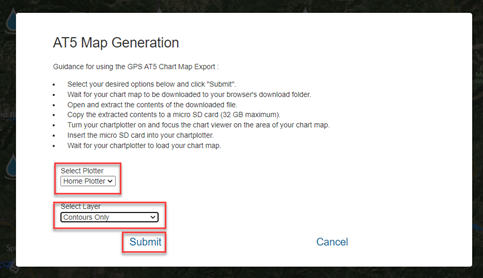
2. Select the plotter and select the layer preference you want for “Contours Only” or “Composition and Contours” and Click Submit:
3. Once the download is complete, using File Explorer, unzip the file and extract the files to your SD card. 7-Zip is not required to extract the files.

4. Once the file is extracted, rename the file to help organize each tile. I would recommend creating a folder on the SD card to organize the tiles.

5. Repeat steps 1-4 for each tile you wish to download.
6. Turn on your plotter and zoom into the area in which the waterbody(s) are located. I like to add a Waypoint to each waterbody I want a map for. It is easier to locate than trying to hunt for them on the screen.
7. Properly eject the SD card from your computer and insert the SD card into your plotter.
8. Once the SD card is inserted into your plotter. The following question should appear.

Tape on Yes and the downloaded maps should appear. If you don’t get the question, please follow the steps below to load the maps manually.
9. With the SD card still inserted in your plotter, with the chart open, tape on More Options.

10. Under Chart Options, click on Chart Source.

11. Then select C-MAP Social Map.

I hope this helps you get the full use out of the new map styles. Keep in mind with this new system, your favorite waterbody could be updated often. Be sure that you have favorited the waterbody. Then on the Notification Preferences page you have the turned on the option “I agree to receive emails about Genesis updates.”


I’ve followed these steps meticulously but can’t quite get it. I’m working on Lake Granby in CO, which needs 4 quadrants. I go through your process, and have to manually select the C-Map tab on my plotter (Lowrance Elite-2 Touch). Navicom at least gives me 50′ contour lines, but C-Map takes it to no contour lines..just a blue lake. Any help would be appreciated. Thanks – Jeff.
Are seeing the same choices I show on the blog? I’ll test out Lake Granby on my Elite 9. The screen shots in the blog are from that unit.
Yes, basically. The only difference being the lake name.
What you describe tells me the social map is not loading on your Elite. If you go to the Chart Source you wouldn’t see a lake name just C-Map Social Map. Is that listed as an option?
It shows CMAP as a selection item, but when I select it I lose countours and shoreline details (much worse than Navionics). I took some pictures, but don’t see anywhere to attach them here (if there’s an avenue for that please let me know).
If have been emailing support. Send the images there and we’ll respond.
C-map genesis has been abandoned. You can no longer access any of the content for some weeks now. Please update your articles to inform people of such. Like me, other will waste countless hours only to realize this.
Hi Chris, I can assure you that GenesisMaps.com has not been abandoned. Our team is recovering the web site after a security breach that bought our sites down. We are in the process of rebuilding the sites and will back online by the end of the month. Sorry for any issues this may have caused. We just ask for your patience while we rebuild.
Hi, nothing happens when I insert my sd. There is no option to select Cmap. Any advice would be great. Cheers
First, make sure that you have the correct serial number or content ID for you MFD in the system. Keep in mind any letters need to be capitalized.