 After hearing anglers everywhere — including 2017 Bassmaster Classic Champion Jordan Lee — talking about how much easier it is to find and catch fish using C-MAP Genesis custom contour maps, you’re likely asking yourself “How do I get in on this?”
The first step to creating your own custom C-MAP Genesis contour maps is to record sonar logs created with sonar signals (soundings) from the transducer on your own boat. This article provides easy-to-follow, step-by-step directions to do that with compatible* Lowrance sonar/GPS units.
Repeat the process detailed below every hour to 90 minutes on the water. Genesis servers can more quickly process 6 one-hour files than one 6-hour file.
Lowrance HDS Gen3, HDS Gen2 Touch & Elite Ti units
- Press the “Pages” button
- Select the “Sonar” Icon
- From the menu on the right-hand side of the screen, select “Advanced”
- From the menu on the right-hand side of the screen, select “Log Sonar…”
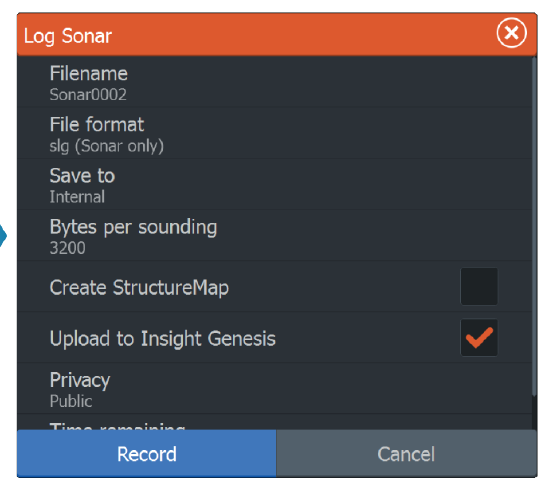 After selecting “Log Sonar…” a pop-up window will open containing several entry fields. The instructions below will explain which entry fields will require your attention in order to create the best sonar-log recordings as possible.
- “Filename” – If you want to name your sonar-log file (you don’t have to, but it makes it much easier to find, organize and upload your files later), click on “Filename”
- This will open a screen with a name field and a “Qwerty” keyboard. Simply touch the keys on the keyboard to add or delete letters, as needed.
- When you have given the file the name you want, click “Enter” and then click the X in the circle at the upper-right corner of the screen. This will exit you from the “Filename” screen and return you to the “Log Sonar” page
- “File format” – To choose which format you want to record your sonar-log file in, click “File format.”
- In the window that opens, you will have three options, only two of which will work to create an C-MAP Genesis map:
- “slg (Sonar only)” – Records only your 200 kHz (2D) sonar for playback later in the C-MAP Genesis trip-replay pane.
- “xtf (Structure Only) – DOES NOT WORK WITH C-MAP GENESIS! DO NOT CHOOSE!
- “sl2 (Sonar & Structure)” – Records both your broadband 200 kHz (2D) sonar AND your Down-Imaging signal for playback later in the C-MAP Genesis trip-replay pane.
- NOTE: sl2 files are much larger than slg files, so if you have no need to, or interest in, viewing your Down-Image view later, choose the “slg (Sonar only)” option
- “sl3 (includes StructureScan 3D) – Records your broadband 200 kHz (2D) sonar data, your down-looking StructureScan data AND your side-looking StructureScan data. At present, however, side-looking sonar data is not integrated into C-MAP Genesis.
- NOTE: sl3 files are much larger than slg files, so if you have no need to, or interest in, re-playing your down-looking and/or side-looking StructureScan data later, choose the “slg (Sonar only)” option
- “Save to” – You must choose “Memory card – Top” or “Memory card – Bottom,” not the default setting, which is “Internal.” Your chartplotter does not have enough internal memory to record a day’s worth of C-MAP Genesis mapping
- NOTE: Almost any off-the-shelf SD card 32g or smaller will work. You do not need an expensive, specialized card. A 64g card will not work in most Lowrance units.
- “Bytes per sounding” – Leave this at the default setting of 3200 – no need to push any additional buttons
- “Create StructureMap” – This is not a setting that will currently affect your C-MAP Genesis log. However, future versions of C-MAP Genesis may incorporate data generated by clicking this box, so you can click it if you want to.
- “Upload to C-MAP Genesis”
- If you are recording sonar with an HDS Gen3 or a Gen2 with a WiFi-1 accessory, you have the option of uploading your sonar logs directly from your chartplotter, from the boat on the water, in the marina, or in your garage or driveway (etc), provided you have a wifi signal (through your smart-phone, marina, or home network, etc).
- If you check-mark this box, your sonar logs will upload to C-MAP Genesis automatically after you stop recording (provided you have a strong wifi signal on your phone and have paired your phone to your chartplotter)
- “Privacy”
- If you are recording sonar with an HDS Gen3 or a Gen2 with a WiFi-1 accessory, and choose to upload your sonar logs directly from your chartplotter, from the boat on the water, in the marina, or in your garage or driveway (etc), provided you have a wif0 signal (through your smart-phone, marina, or home network, etc), you can mark them “Public” or “Private” at the time of upload, provided you have a Premium C-MAP Genesis account
- If you click “Public,” your sonar logs can be aggregated with other public data and used to improve the contour coverage in the C-MAP Genesis Social Map chart for the waterbody you are/were when you recorded your sonar log
- If you click “Private,” your sonar logs will be uploaded ONLY to your private account and will not be used in any other way
- NOTE: No matter which setting you choose, waypoints, trails and tracks are NEVER uploaded, as that data is not even included in the sonar signal that is recorded from your transducer. With either setting, another person or entity will NEVER have access to your waypoints, trails or tracks.
- “Time remaining” – Shows you how many more hours and minutes of recording time remain on your SD card. No need to push any buttons here.
- “Record” – Click this button to begin recording a sonar log (only after following the above steps)
- If you are recording sonar with an HDS Gen3 or a Gen2 with a WiFi-1 accessory, and choose to upload your sonar logs directly from your chartplotter, from the boat on the water, in the marina, or in your garage or driveway (etc), provided you have a wif0 signal (through your smart-phone, marina, or home network, etc), you can mark them “Public” or “Private” at the time of upload, provided you have a Premium C-MAP Genesis account
- In the window that opens, you will have three options, only two of which will work to create an C-MAP Genesis map:
Learn better by watching than reading? Watch this video. (Article continues below video player)
Lowrance Elite HDI, Elite CHIRP, Hook & HDS Gen1 or Gen2 Non-Touch units
- From your SONAR page, press the “MENU” button
- Near the bottom of the menu options, select “Log sonar…”
- Scroll left from “Cancel” over to “Start Logging”
- If the “Start Logging” button highlights in blue with the words displaying in white text, push the “Enter” button. You are now recording (AKA “logging” your sonar). A blinking red button will appear on the upper right-hand corner of your screen.
- If the words “Log Sonar…” display in black text within the blue highlight, that indicates that you do not have an SD card loaded into your card slot, and you will not be able to activate the button and begin recording. If you encounter this, turn off your unit, insert a mini-SD card and repeat the steps above.
Learn better by watching than reading? Watch this video. (Article continues below video player)
How to stop a sonar-log recording
To stop recording a sonar log, follow these steps below. Note: The “Stop sonar” prompt will NOT stop your sonar-log recording. It WILL turn off your transducer, preventing it from sending and receiving sounding signals and calculating your vessel’s depth. You’re going to want to select the “Stop Logging” prompt. The directions below will explain how to find it, no matter which Lowrance unit you are using.
- HDS Gen3 & Gen2 Touch
- While on your “Sonar” page, press the “MENU” button
- Select “Log Sonar”
- Select “Stop Logging”
- HDS Gen1 & HDS Gen2 (non-touch)
- While on your “Sonar” page, press the “MENU” button
- Select “Log sonar…”
- Select “Stop Logging.”
- Elite HDI, Elite CHIRP & Hook:
- While on your “Sonar” page, press the “MENU” button
- Scroll down until “Log sonar…” is highlighted in blue, then click the “Enter” button.
- Scroll left from “Cancel” until the “Stop Logging” box is highlighted in blue and then click the “Enter” button
Congratulations! You’ve just learned the first step in creating your own custom contour maps. The second step is registering for a free C-MAP Genesis account (Click HERE to do that). The third step is to upload your recorded sonar logs to the C-MAP Genesis cloud for review in your C-MAP Genesis dashboard. (Click HERE to learn how to do that).
* To use C-MAP Genesis maps on the water, you’ll need a compatible Lowrance, Simrad or B&G chartplotter.


Can i get my maps on my iphone nor ipad so i can use them ice fishing?
Maps that are contributed to our Social Map are integrated into our C-MAP Embark app, which will work great on your phone or iPad. Learn more about the Embark app here:
http://lightmarine.c-map.com/gb/mobile/c-map-embark-app
— Greg
Why must the sonar recordings be at a fixed 200 kHz? I fish in water up to 750 ft deep and use low chirp most of the time. Could I record with Low Chirp also?
Hi Jan Oor – You can log with any frequency with a solid depth reading and Genesis should produce a depth map. You just wouldn’t get bottom hardness at any frequency other than 200.
Thanks for the swift response!
You caught us at a good time 😉
I cannot get my Lowrance Hook Revel 7-st to find the settings to start recording. Everything I’ve read says it will but can’t find any videos on the hook 7. I have 32 sd card but can’t figure it out.
With the unit turned on, press and release the power button. The “System Control” menu will appear and the you should see a “Record Sonar” on screen button. Just click. There are many options for recording. For the best results use the .SL2 format.
I’ve been to the screen but the only option it gives me is to save to the internal memory and right now it’s giving me 21 minutes of remaining time does that mean it’ll stop? I’m trying to get cement Genesis on this machine but I have to be able to upload it to their website and then download it back into my machine and it won’t let me save it anywhere but internally. Am I going to have to restart it every 20 minutes and do another file. Thanks for your help
Yes it’ll stop at 21 minutes.
Ok, I think I figured this out. It’s not letting me change from Internal to the SD card and I need that for more space. I insert the SD card that doesn’t click in and out like normally they do it just goes in and then I have pull it with my fingers. I don’t think it’s reading the SD card it can’t find it to allow me to switch to that instead of recording internally. Is this possible.
I think the MFD is not seeing the SD card. It sounds like the spring in the SD card slot is not working. You should be able to click it in and click it out. The spring will push the SD card out enough to pull the card out easily. So just from a basic trouble shooting step, just double check that you are putting the card in the correct way.