The Genesis Live file (.GSD) can now be uploaded to your account.

Genesis Live in action.

The .GSD file is data saved when using the Genesis Live Feature on your newer Lowrance Device*. The .GSD file is a much smaller file than the standard .SL* file and will upload faster than the standard .SL* file. Now you can upload the .GSD file to your Genesis account, merge it to your custom map and in the near future to the Social Map**. Keep in mind the file only contains depth and GPS location information. The .SL* file contains other information such as vegetation and bottom composition. In this blog we’ll cover how to get the file from your unit to your account on Genesismaps.com. 

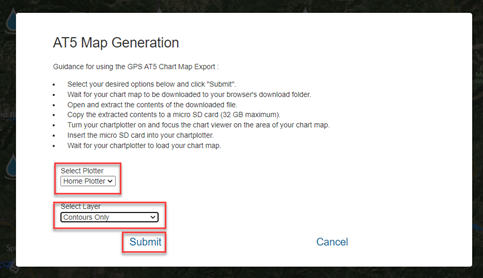
Step 1: Create a Custom Map Using Genesis Live

Lowrance’s Genesis Live feature allows anglers and boaters to create their own detailed maps of the underwater environment in real-time, as they navigate through the water. These custom maps are automatically saved on a Micro SD card with a .GSD file extension, which can be uploaded to the C-MAP Genesis cloud-based service for sharing with others. Here’s how to create a GSD file and upload it to the C-MAP Genesis server.

To create a custom map using Genesis Live, you’ll need a compatible Lowrance MFD unit, such as the HDS LIVE or Elite Ti2. Once you’ve got your MFD unit set up and connected to your boat’s transducer, follow these steps to create a custom map:

  • Place a 32 GB or smaller Micro SD card in the slot of your Lowrance Unit.
  • Select “Genesis Live” from the Chart “Overlay” options.
  • Start navigating through the water, and Genesis Live will begin creating a custom map of the underwater environment in real-time.
  • Continue navigating until you’ve mapped the area you’re interested in; the custom map will be saved to the SD card in your MFD unit as a .GSD file.

Step 2: Upload the GSD File to the C-MAP Genesis Server

Now that you’ve created a custom map in the form of a GSD file, it’s time to upload it to the C-MAP Genesis server so that it can be shared with others. Follow these steps to upload your GSD file:

  • Go to the C-MAP Genesis website (https://www.genesismaps.com/).
  • If you don’t already have a C-MAP Genesis account, create one by clicking on the “Sign Up” button and following the prompts.
  • Once you’re signed into your C-MAP Genesis account, click on the “Web Upload” button.
  • Follow the prompts to upload your GSD file to the C-MAP Genesis server.
  • Once your GSD file has been uploaded and processed, you may** view it on the C-MAP Genesis Social Map, sharing it with other C-MAP Genesis users or purchase an Edge account to view your trips from the dashboard, keep them private and use trip editing functions including merging the GSD file with the standard .SL* files.

.GSD Trip on the Dashboard

.GSD trip in the Trip Viewer

And that’s it! With Lowrance’s Genesis Live feature and the C-MAP Genesis cloud-based service, creating and sharing custom maps of the underwater environment has never been easier. Whether you’re an angler looking to share information about productive fishing spots or a boater looking to navigate through areas that may not be well-charted on commercial maps, the GSD file and the C-MAP Genesis service can help you take your on-water adventures to the next level.

*Compatible devices include Hook Reveal, Elite Ti, Elite Ti2, Elite FS, HDS Gen3, HDS Carbon, HDS Live, HDS Pro

**Depending on the waterbody and the quality of the data it could be excluded from the Social Map.

Downloading Multiple Social Map Tiles

It seems that many of you have questions about the new social map. One of the biggest questions we get is “Can I download multiple tiles to display on my plotter. The short answer is Yes. In this blog we’ll cover how to download the tiles and best steps to keep the tiles organized on your SD card.

You do need to have a plotter already added to your account. To add a plotter please click on the “Plotters” button found on the “Dashboard.” For this example, we’ll look at Lake Pend Oreille as you can see in the screen shot below it covers 5 different tiles. Here are the steps to download tiles to be used on your plotter.

1. Click on the water droplet for the tile you wish to download and click Download Map:

2. Select the plotter and select the layer preference you want for “Contours Only” or “Composition and Contours” and Click Submit:

3. Once the download is complete, using File Explorer, unzip the file and extract the files to your SD card. 7-Zip is not required to extract the files.

4. Once the file is extracted, rename the file to help organize each tile. I would recommend creating a folder on the SD card to organize the tiles.

5. Repeat steps 1-4 for each tile you wish to download.

6. Turn on your plotter and zoom into the area in which the waterbody(s) are located. I like to add a Waypoint to each waterbody I want a map for. It is easier to locate than trying to hunt for them on the screen.

7. Properly eject the SD card from your computer and insert the SD card into your plotter.

8. Once the SD card is inserted into your plotter. The following question should appear.

Tape on Yes and the downloaded maps should appear. If you don’t get the question, please follow the steps below to load the maps manually.  

9. With the SD card still inserted in your plotter, with the chart open, tape on More Options.

10. Under Chart Options, click on Chart Source.

11. Then select C-MAP Social Map.

I hope this helps you get the full use out of the new map styles. Keep in mind with this new system, your favorite waterbody could be updated often. Be sure that you have favorited the waterbody. Then on the Notification Preferences page you have the turned on the option “I agree to receive emails about Genesis updates.”

What have you done to the Social Map?

As you may or may not have seen yet, Social Map has changed for the better. While change is hard and can be difficult to adjust to, we think you’ll like this change. In this blog I’ll cover the changes to the Social Map and how to effectively use it to help in your boating/fishing experience.  We didn’t change any private trips you may have.

Why the change to the Social Map?

We are looking to catch up with the Internet of Things (IoT). If you are not familiar with the term of Internet of Things. It means that at some point, almost every appliance, device, car, and boat, is or well be connected to the internet and a phone app. This gives you and the manufacture updates on the status of your devices.

The IoT change is out from Simrad with the introduction of the Simrad NSX plotter and Lowrance will soon be following suit. The NSX unit is built with a common programming code base. The code base gives Navico the ability to create apps faster and make changes easier. Including the possibility of accessing Social Map from the plotter, faster and easier. Don’t worry, we didn’t leave the current plotters out of our development. You can still download your favorite waterbodies in the AT5 format on to your current plotters. See below for more information on the changes to the AT5s.

The best part of this change is that your trips may be added to the waterbody/section on Social Map in a day or two. This depends on the number of trips in the processing queue. Please keep in mind that when adding a trip to a waterbody that already has data in the area or tile of your trip or there was an error with your trip, it may not show up on Social Map. For best results follow the guide in this blog post, https://insightgenesis.wordpress.com/2016/03/23/how-to-record-c-map-genesis-sonar-logs-with-a-sonargps-unit/.

What is with the change of color for depth?

We did change the colors used for depth. We also changed how the colors are applied. In the previous version the colors were based on each waterbody. If a waterbody’s deepest point was 4 feet (1.22 Meters) that would be the darkest blue. That is no longer the case. Each depth has its own color now. Now 4 feet (1.22 Meters) uses the same color on every waterbody. This helps give you a better perspective of depth.

I can still see my favorite waterbodies but how do I favorite a waterbody?

As you may have noticed there is no longer a star to click on a waterbody from the Social Map. That star has been moved to the waterbody search page. To find the waterbody you want to favorite, mouse over the down carrot under Social Map on the heading. Click on “Social Map List” and you’ll see the list of your favorite waterbodies, if you have any. Under the list of Favorite Waterbodies, you’ll see a text box to enter the name of the waterbody you want to search for. Just enter the name and click Search.  The search results will appear in the section below. To favorite a waterbody just click on the star. The star will change from an outline star to a solid blue star.

If you want to burn some time you can manually search through the entire list of waterbodies. The list is broken down in alphabetical order by country, then by state or province and waterbody name. When you mouse over the waterbody name and click on it, the Social Map page will open. The waterbody you clicked on will be in the center of your screen.

Clicking on the name to see on the Social Map page also applies for the list of Favorite Waterbodies at the top of the page. You can unfavorite a waterbody just by clicking on the star, in the list of Favorite Waterbodies. The star will change from a solid blue star to an outline star. You can still unfavorite a waterbody on the Favorites Waterbody list found on the drop down on the Social Map page.

Downloading AT5 files for your Plotter.

For the most part, the Social Map AT5 download process has stayed the same. You still need to add the plotter you are using on the Plotters page. Once you have that done, go to the Social Map. Find the waterbody you are looking for and click on the waterdrop that is the closest to that waterbody. When you click on the waterdrop a yellow outlined box should appear. The waterbody should appear within that box to download the AT5 file for it.

When you click on the waterdrop you’ll see the Send Feedback (this will be covered next) and Download Map options.  Click on Download Maps and then the AT5 Map Generation modal will open. For your information the process to download and use an AT5 file is displayed. The best part is you can download and display more than one tile at a time on your plotter.

Send Feedback!

As you may have seen from a previous screen shot you have the option to send feedback. When you click on the Send Feedback option a new modal will open. It’ll contain your account name, email, and phone number (if you added it), the option to add an attachment (i.e., a screenshot), and place to enter comments. Once you have completed filling in the information click on “Send Request”. When the request is sent, the notification we get will contain information about the tile you are commenting about. From there, one of our QA GIS support team members will look at your feedback and take the appropriate action.

So why send us feedback? We did our best to keep errors out but when you are dealing with over 14k tiles in the world, errors are going to come up. We did try to address as many as possible during testing, but some are going to fall through the cracks.  You as the Social Map user are going to know your favorite waterbodies better than we do. Thus, the term Social in front of Map.

Hopefully this will blog gave you good idea of why we made the change and how you can use it effectively. Watch for more changes from us in the next few months. We think you’ll really like them.